Instructions for Project Managers

Netcomment.net is a web-based service designed to streamline the document review and commenting process. With Netcomment.net, you can quickly create projects, define schedules, and assign project participants with their specific roles, permissions, and responsibilities. The service gathers all project-related information in one place: who said what and when, which version is being reviewed, upcoming deadlines, and more. All information is easily and reliably available whenever needed.

Reviewing materials is fast and straightforward. Corrections can be targeted effortlessly with a simple mouse click, while real-time visibility into previous material versions and other reviewers’ comments helps reduce misunderstandings and confusion.


Table of contents

1. Kirjaudu palveluun

Quick Guide to Creating a Project

  Log In to the Service

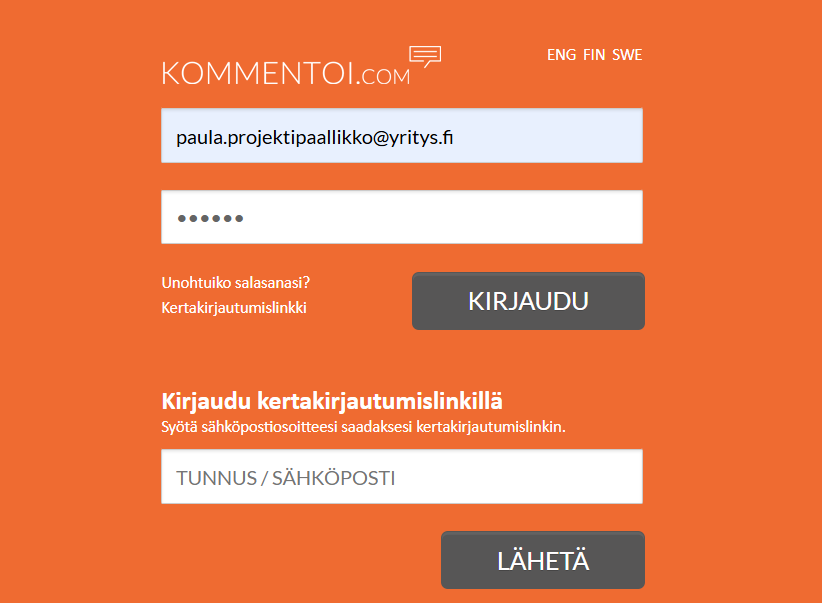
Log in to the service using your personal credentials. Your username is always your email address, and your password has been sent to you in advance by email. If needed, you can easily request a new password using the Forgot my password function on the login page.

NEW*: You can now also log in using a Single Sign-On Link. Click the Single Sign-On Link option and enter your email address in the field that appears below. A login link will be sent to the email address you provided, allowing you to access the service quickly and easily. The link is valid for 15 minutes.


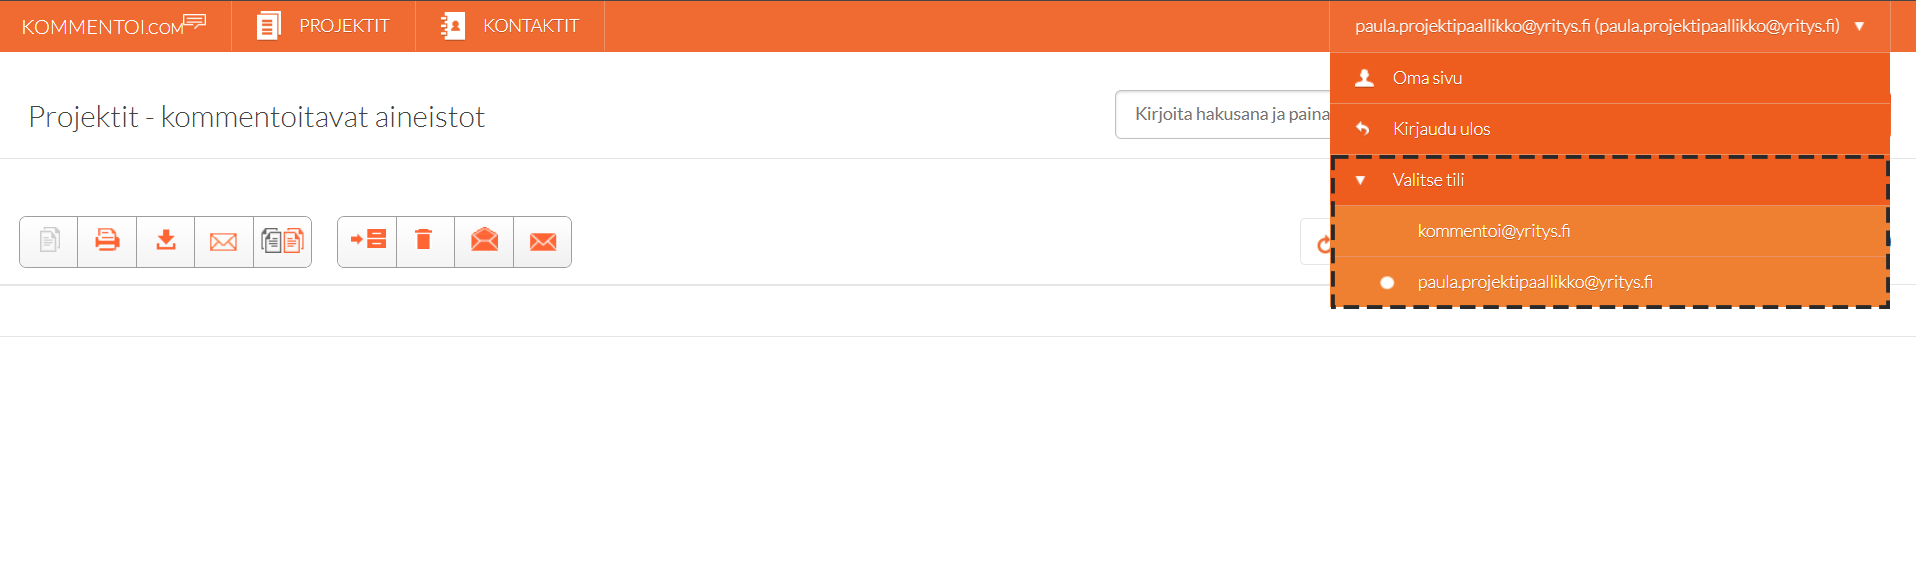
If your organization uses shared group accounts, select the desired account from the drop-down menu in the upper-right corner of the view after logging in.

A group account is an organization-wide shared account that can be used by multiple users. In addition to managing their own projects, users can also manage their colleagues’ projects when needed.

To access a group account, first log in with your personal account and then select the desired group account from the Select Account drop-down menu in the upper-right corner of the view.


Access to a group account must be granted by your organization’s Admin user.

  Create a Project

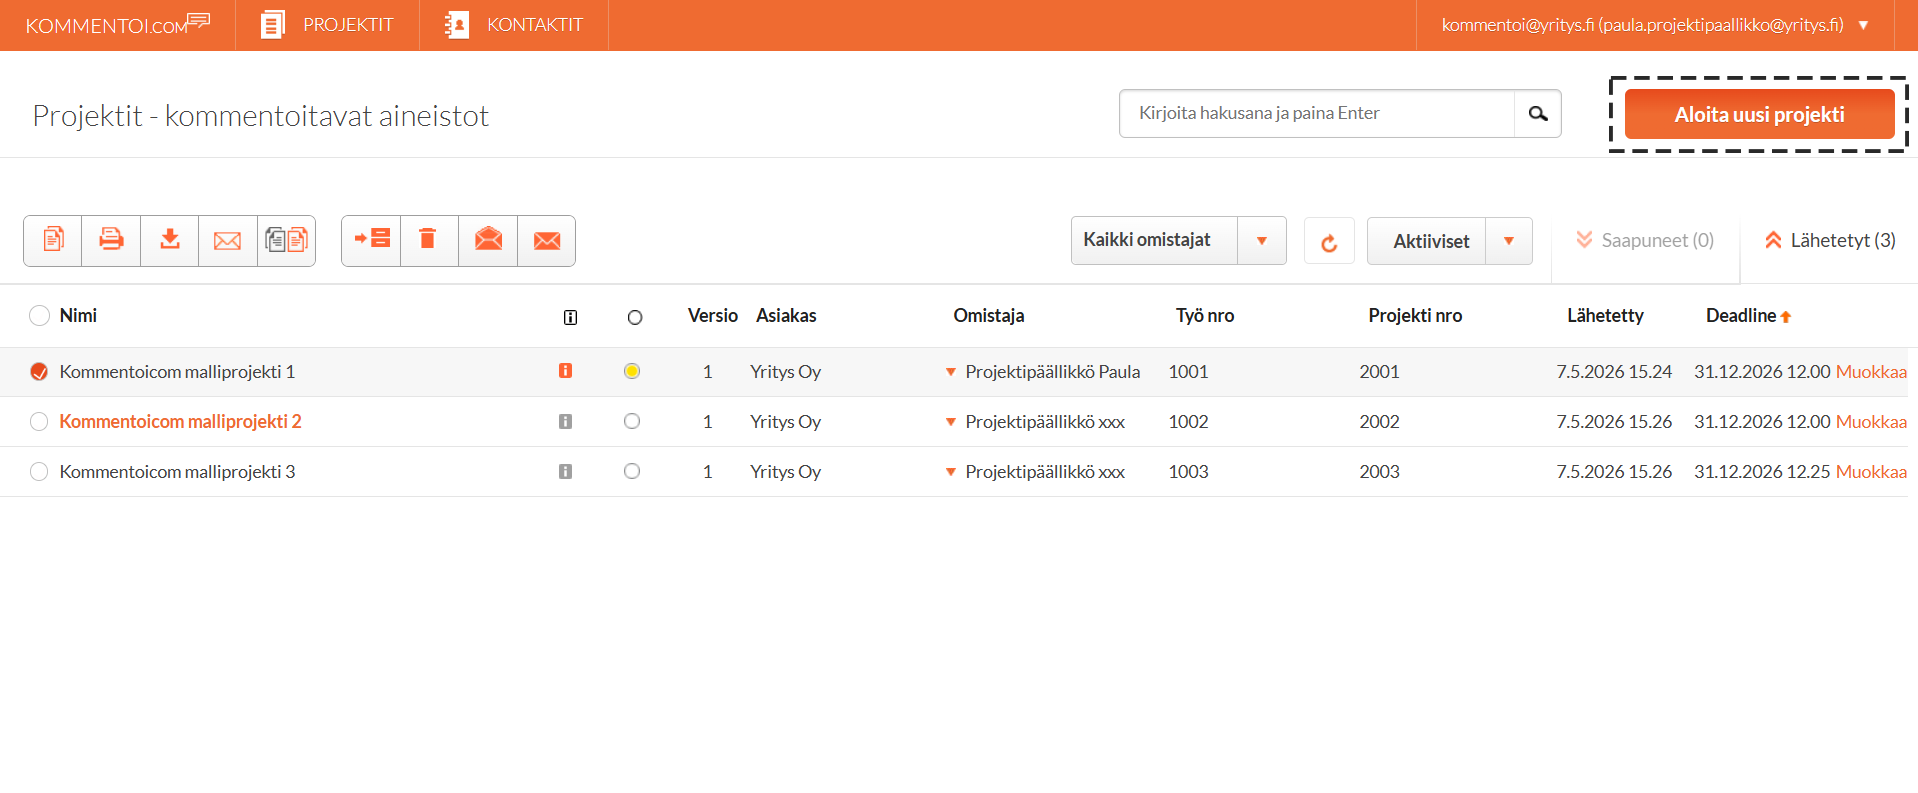
Click Start a New Project in the upper-right corner of the page.

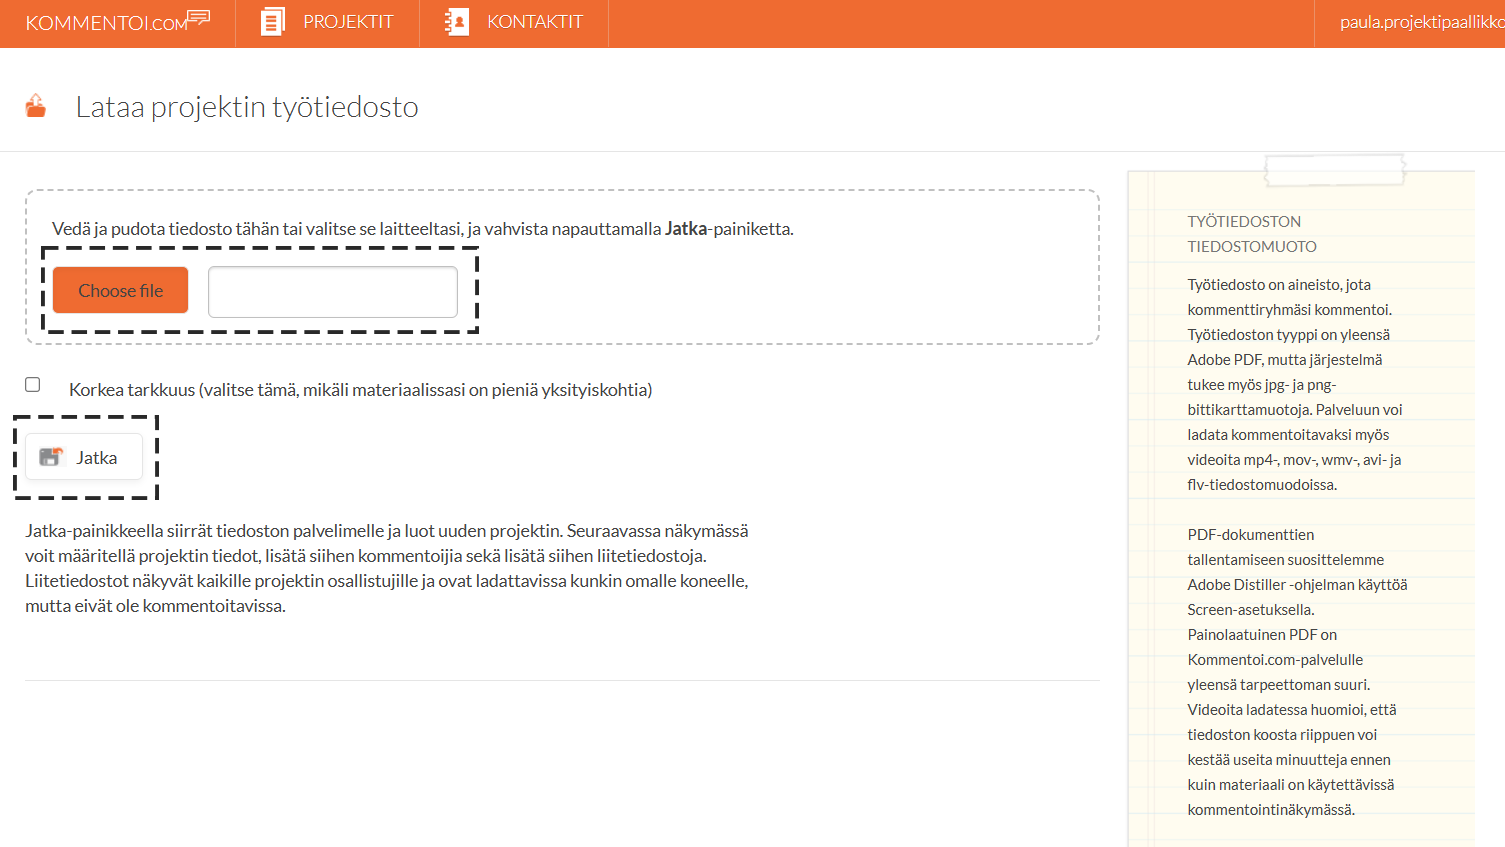
Select the project file you want to send for review either through the file dialog or by dragging and dropping the file directly onto the area marked with a dashed outline. Finally, click Continue.

The project file is the material that your review group will comment on. The file format is typically Adobe PDF, but the system also supports JPG and PNG bitmap image formats. You can also upload videos for review; supported formats include .mp4, .mov, .wmv, .avi, and .flv.

PDF files should preferably be created with Adobe Distiller using the Screen settings. Print-quality PDFs are usually unnecessarily large for Netcomment.net. When uploading videos, please note that depending on the file size, it may take several minutes before the material becomes available in the review view.


If your file contains very small details, small text, or similar fine elements, select High Resolution.

  Fill in the Project Details

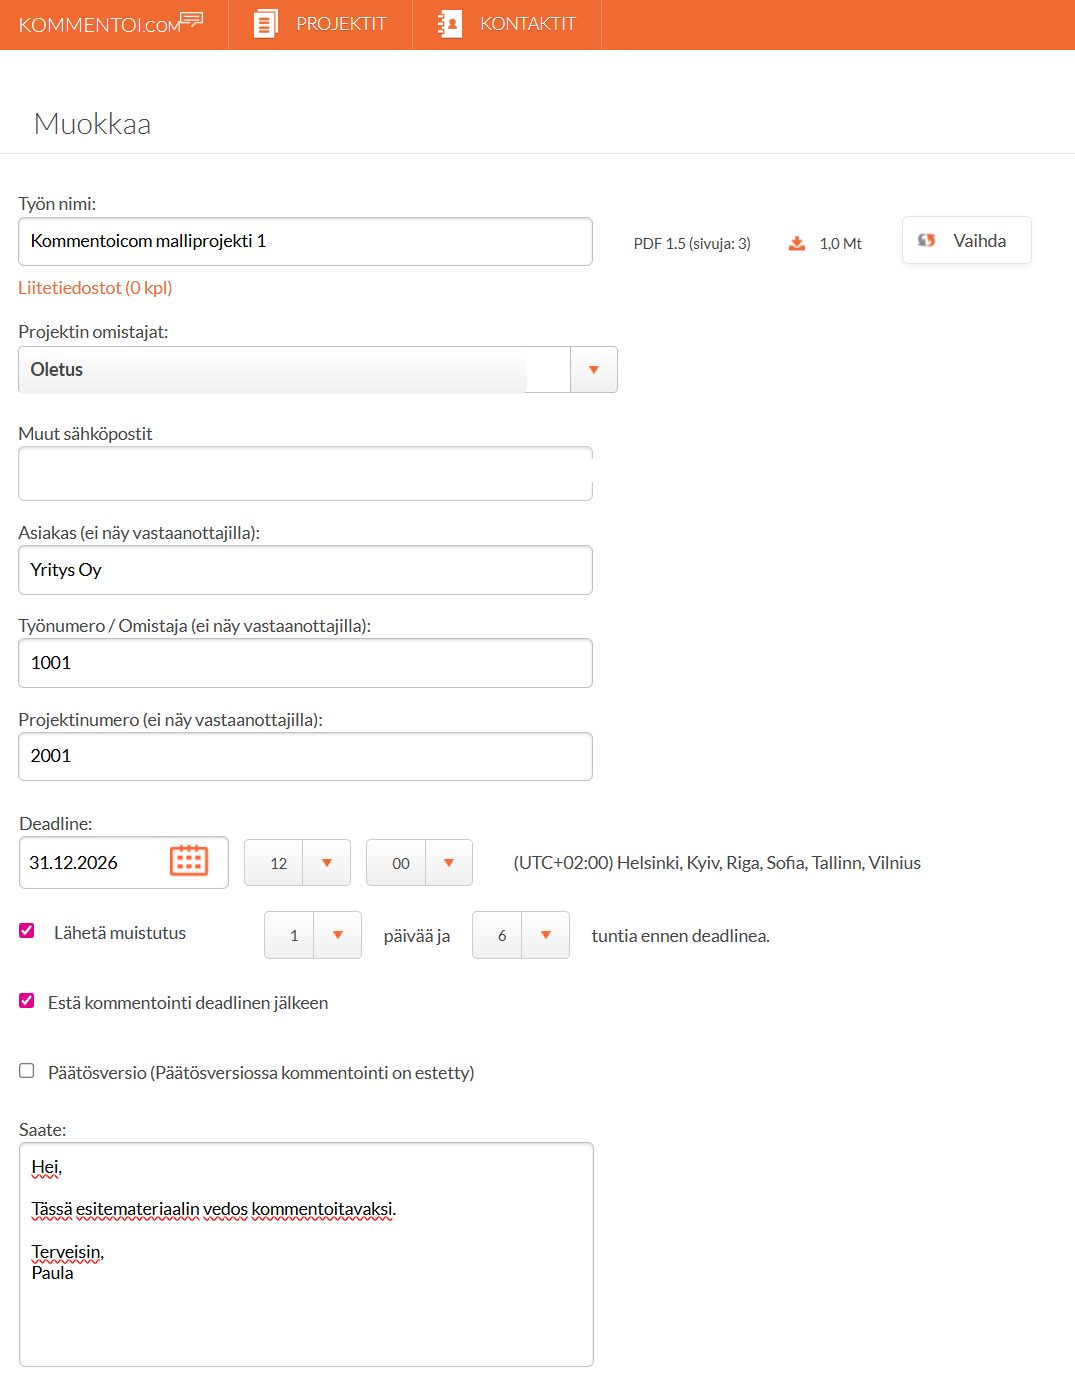
The most important fields are the project name, deadline and reminders, disable commenting after the deadline, and the cover message, all of which are visible to other members of the project group in one way or another.

If you are working with a shared group account, select yourself as the project owner. This ensures that notifications about the progress of the review process are sent to your personal email according to your personal My Page settings.

The other information fields are primarily intended for your own use and are not visible to other members of the project group.


The Final Version feature changes all commenters into information recipients. This provides a quick way to send the final version to the review group for reference without having to individually change each commenter’s role to information recipient.

Project Name
By default, the name of the uploaded project file is used. Change it if needed.

Additional Email Recipients (feature available only for shared group accounts)
If needed, you can add people here who are not part of the project group but who should still receive the project progress emails sent by the service. Notifications are sent according to your personal account settings; see the My Page section of these instructions.

Owner  (feature available only for shared group accounts)
Select yourself as the project owner. This allows you to filter the project list to show only your own projects and ensures that progress notifications for your projects are sent to you by email and/or text message according to the selections in your personal account’s My Page settings. Your default signature saved in My Page settings will also be automatically included in the cover message of the projects you create.

Customer, Project Number, Job Number
Free-form fields in the project list that you can use as needed. The project list search function also searches content entered into these fields.

Deadline
Set the deadline for the current project version by which you want the project group to complete their review of the material.

Reminder
You can set an automatic reminder that will be sent to project participants who have not commented on the material before the specified reminder time.

Disable Commenting After the Deadline
Select this option if you want to prevent commenting on the material after the deadline has passed.

Cover Message
The cover message is displayed in the automatic project email sent to the project group and when the project is opened for the first time.

  Select the Project Group and Define Permissions

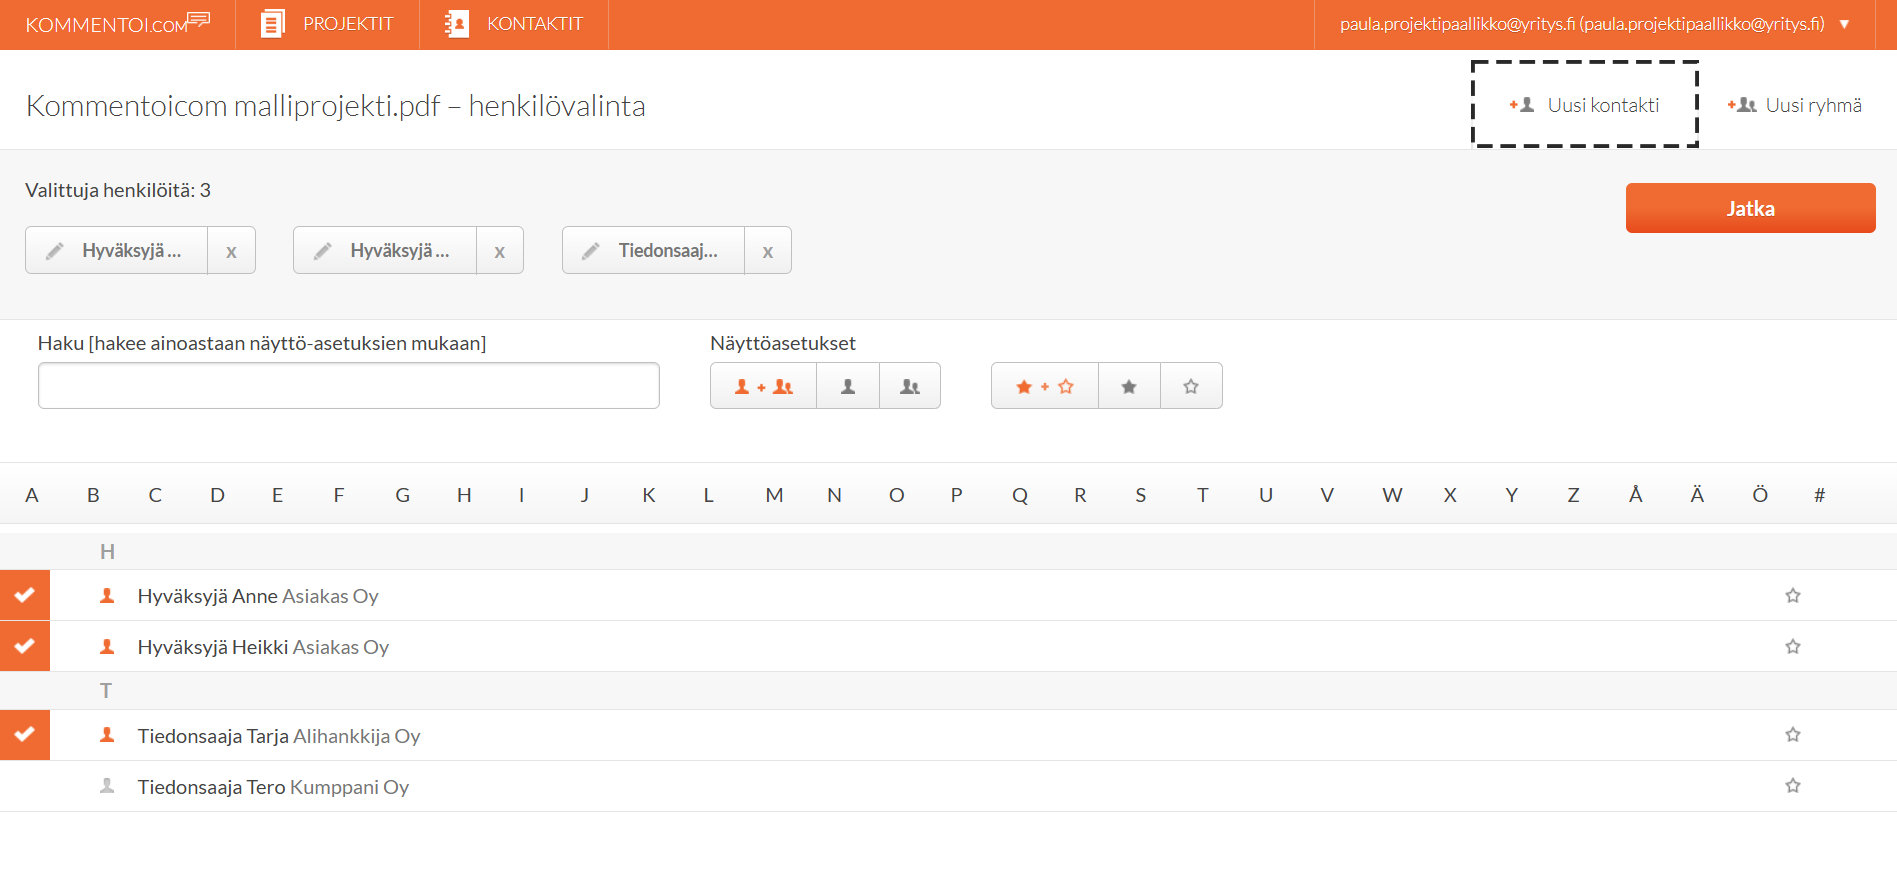
Click Select at the bottom of the page to access your contact list and choose the project group.


Select the desired people from the contact list and assign permissions as needed.

  Commenter: permission (and responsibility) to comment on the material.

  Information Recipient: viewing access to the material and its comments, but no permission to add comments.

You can also create new contacts for your contact list at this stage using the New Contact function in the upper-right corner of the view. Read more in the section Creating and Managing Contacts.


After selecting the people you want to include in the project, click Continue to return to the project details view.
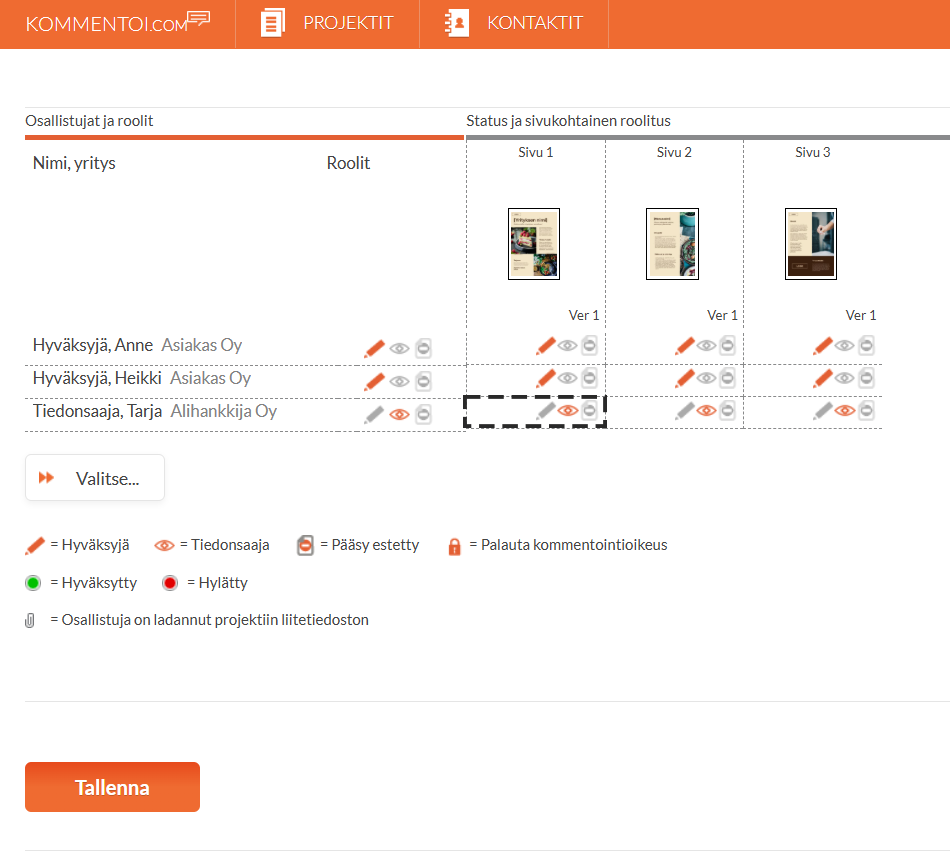
Define Page-Specific Permissions if Needed

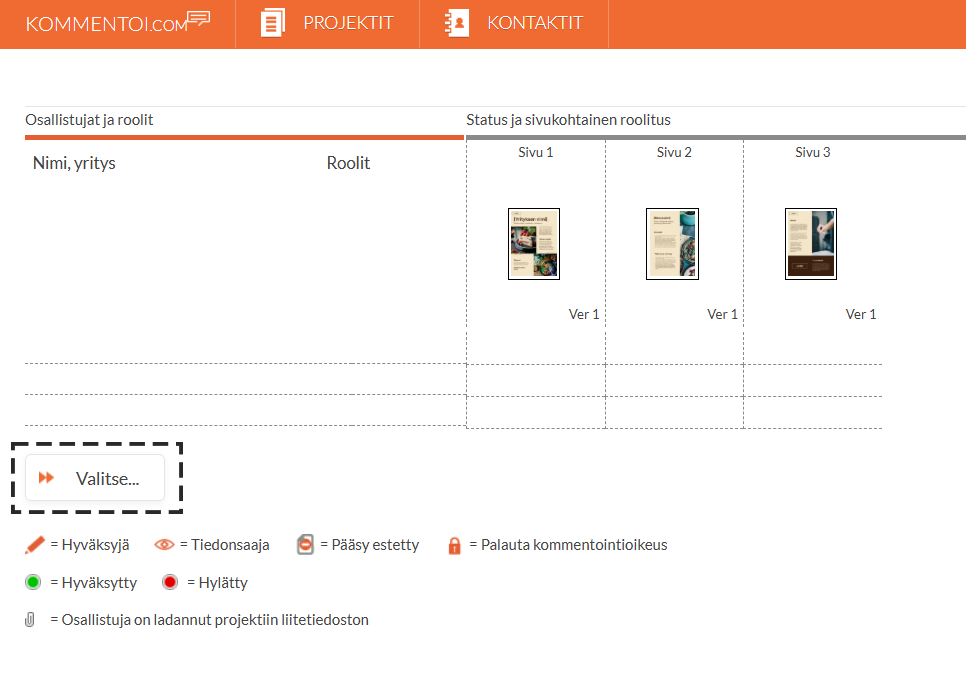
Using the table at the bottom of the project details view, you can define permissions for individual users on a page-by-page basis if necessary.

   Commenter: permission (and responsibility) to comment on the material.

   Information Recipient: viewing access to the material and its comments, but no permission to add comments.

   Hide Page: no viewing access to the page.

Click Save to proceed to the project list view.
  Review, Select the Project Owner and Send
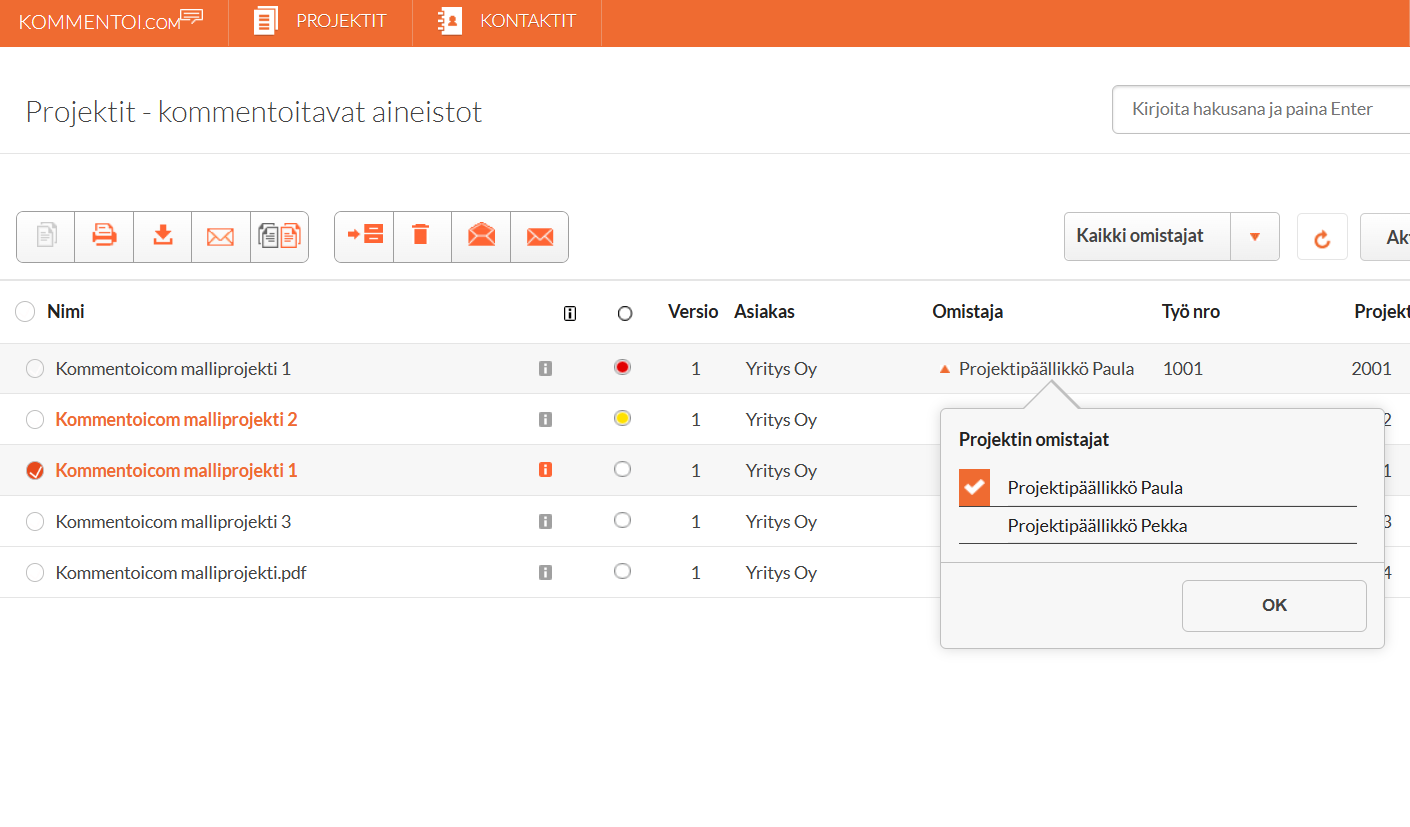
If you are using a group account, select an Owner for the project from the project list.

Open the project by clicking the project title. Add your own comments to the project pages if needed, and return to the project list using the Projects button at the top of the page.

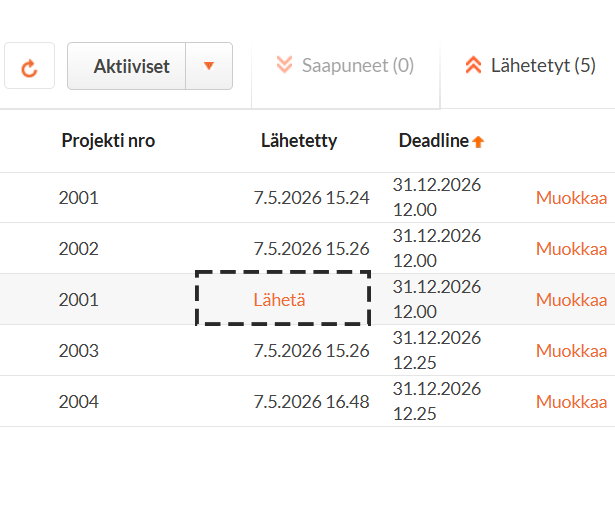
Click Send, and the people you selected for the project will automatically receive a project email (and a text message if they have enabled the SMS service). They can then access the material and add their own comments.

Creating and Managing Contacts

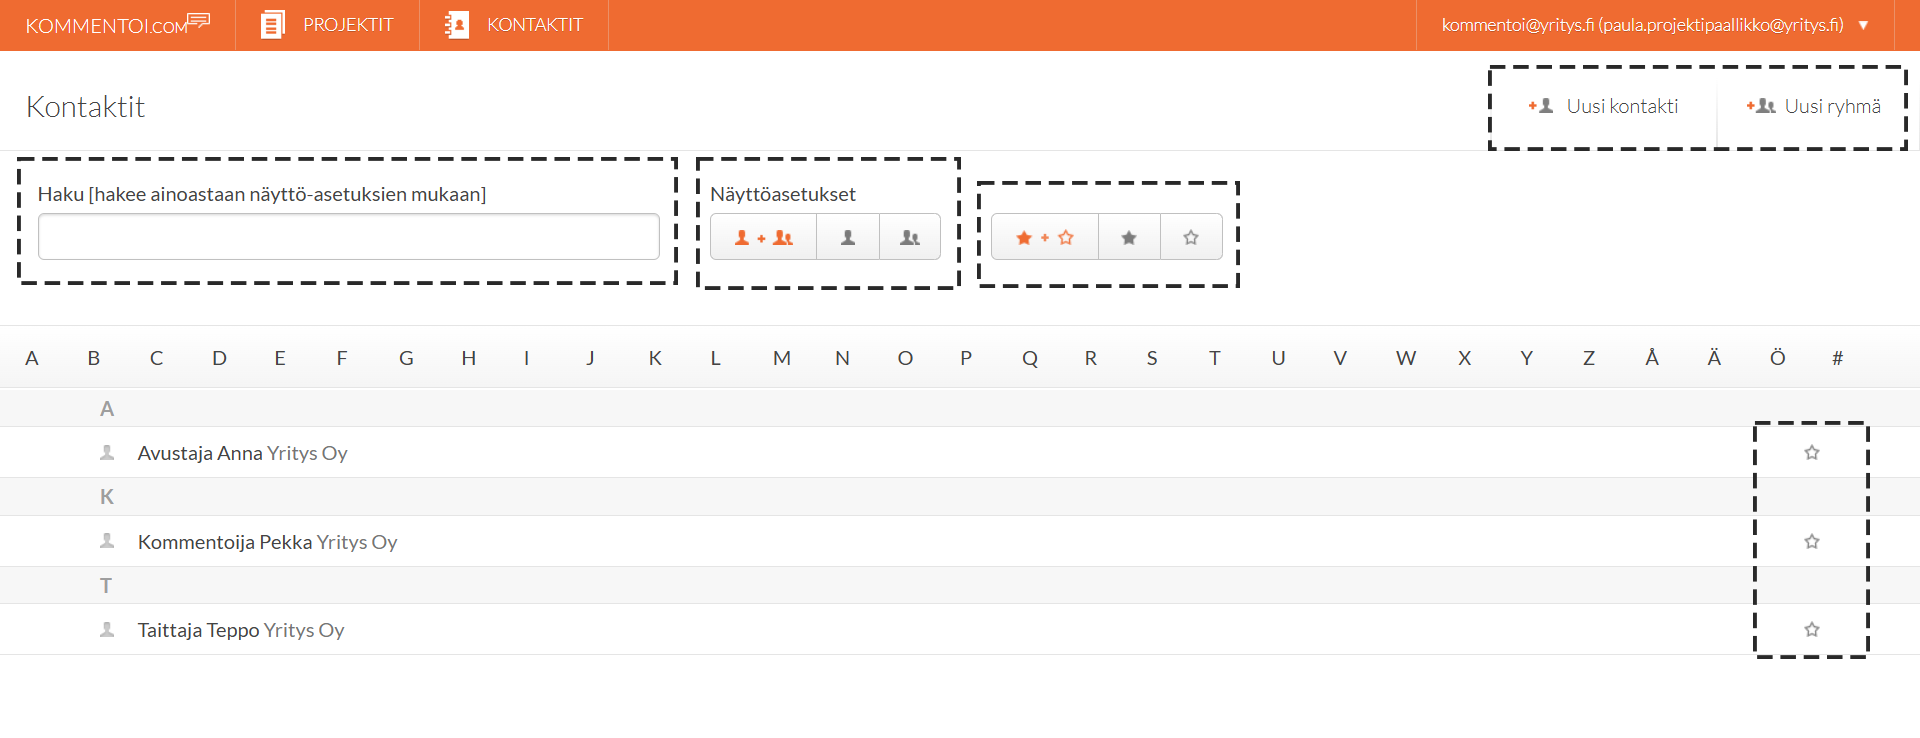
Add the people to the contact register to whom you want to send materials for review. You can also create ready-made contact groups and define default project roles for the group members. Contacts and contact groups can also be created while setting up new projects.

The people you add to your contact list automatically receive access credentials for the service and can view the projects you send to them. If the person already has a user account in the service, their information will be filled in automatically when creating the contact.

Using the search functions, you can search for people in the list, and with the display settings you can filter the view to show, for example, only contacts marked as favorites, contact groups, and more.

Commenting progress and process

Project Statuses

From the project list, you can see the status of your projects and the progress of the review process.

  – Review has not started – the project has not yet been reviewed.
  – Review in progress – at least one page in the project is still unprocessed by at least one commenter.
  – Reviewed and rejected – at least one commenter has rejected at least one page.
  – Reviewed and approved – all commenters have approved all pages of the project.
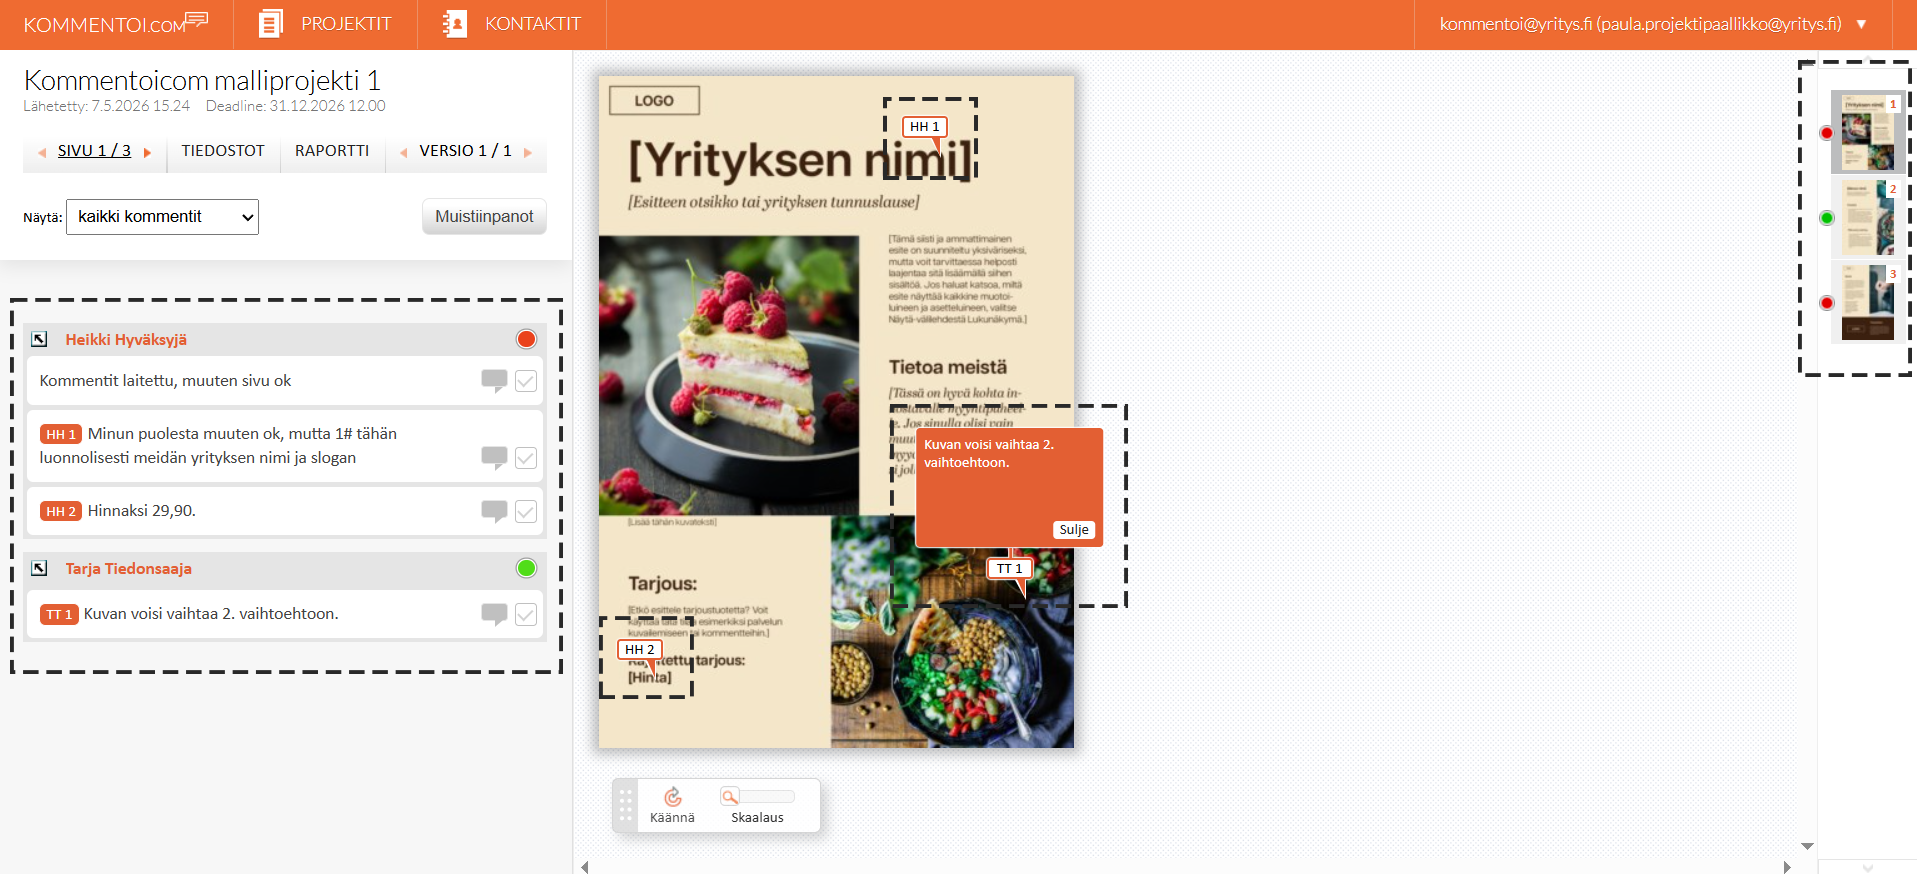
New Approvals and Rejections

The project status indicator flashes and the project row is highlighted whenever new comments have been added to the project (pages have been approved or rejected).


The highlight is removed when you open the project. You can also manually remove or set the highlight using the Mark as Unread and Mark as Read functions located above the project list.

View Comments

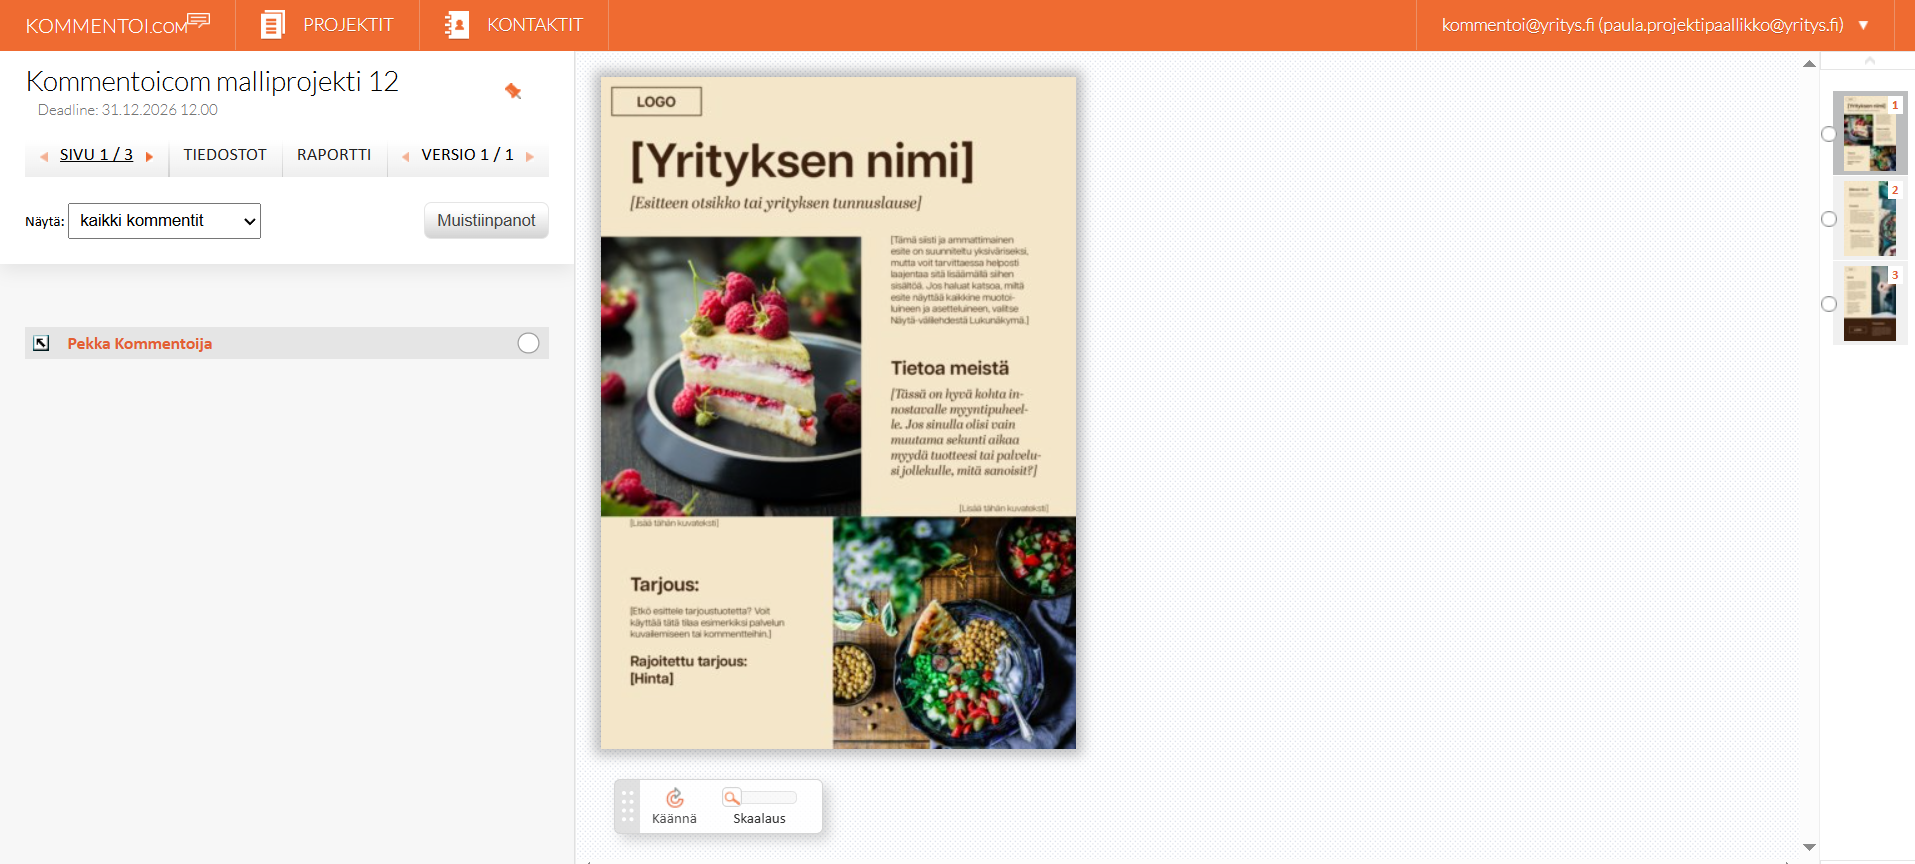
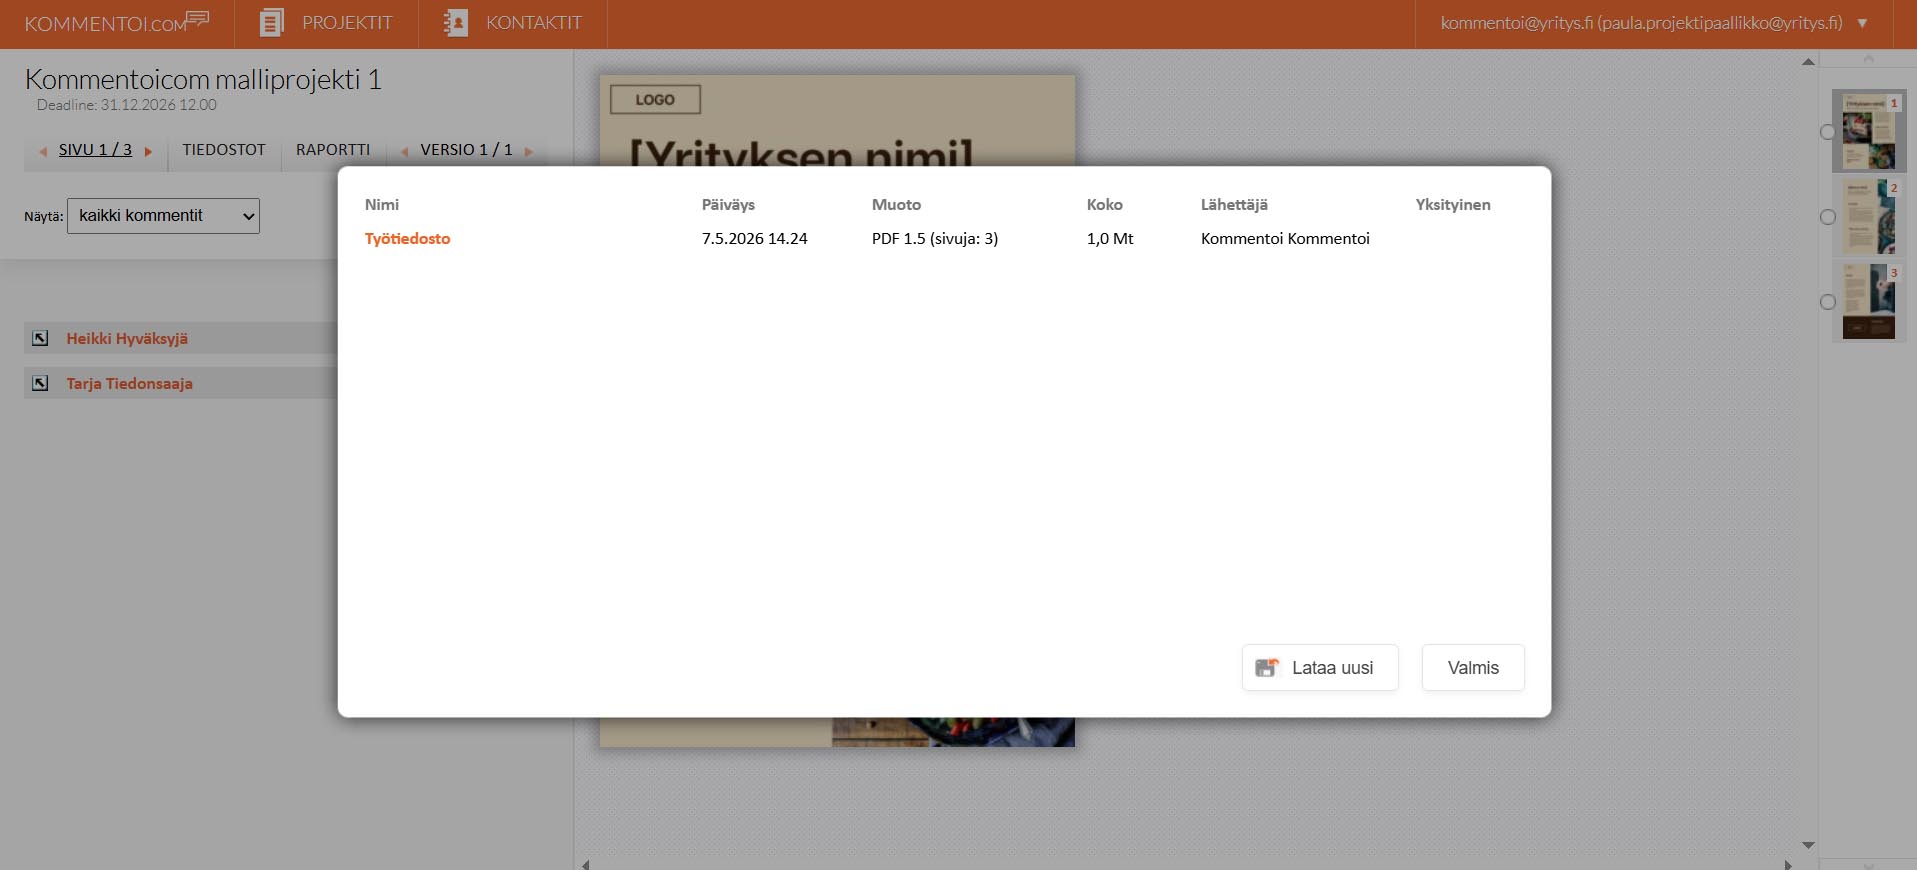
Open the project by clicking the project name. In the review view, you can see all comments, approvals, and rejections recorded for the project.

Comment View

On the left side, you can see all project group members, their decisions (approval or rejection), and all recorded comments.

By default, the information is displayed in chronological order, with the most recent items shown at the top of the list.


Using the filter function at the top of the list, you can choose whether to display comments from all commenters or from a single commenter only.

Linking Comments to Comment Markers

Each commenter can leave both general comments related to the page as a whole and comments targeted to a specific area using comment arrows.


You can hide an individual commenter’s comment arrows by clicking the arrow icon next to the commenter’s name.

Page Icons

The page icons on the right side of the view show the status of individual pages.

  – Page has not been reviewed
  – Review in progress – the page is still unprocessed by at least one commenter
  – Reviewed and rejected – at least one commenter has rejected the page
  – Reviewed and approved – all commenters have approved the page

A flashing status indicator means that new comments (an approval or rejection) have been added to the page. Opening the page removes the flashing indicator.
Mark a Comment as Processed

On the right side of each page comment, there is a checkbox that allows you to mark the comment as processed, as well as an action button that lets you add an internal note to the comment.


The notes you add are not visible to the commenters.

Other Functions in the Comment View

Files

Here you can download the original file being reviewed as well as any additional attachments added to the project by the workgroup members.


You can also add your own attachments to the project — either files visible only to you or files visible to the entire project group.

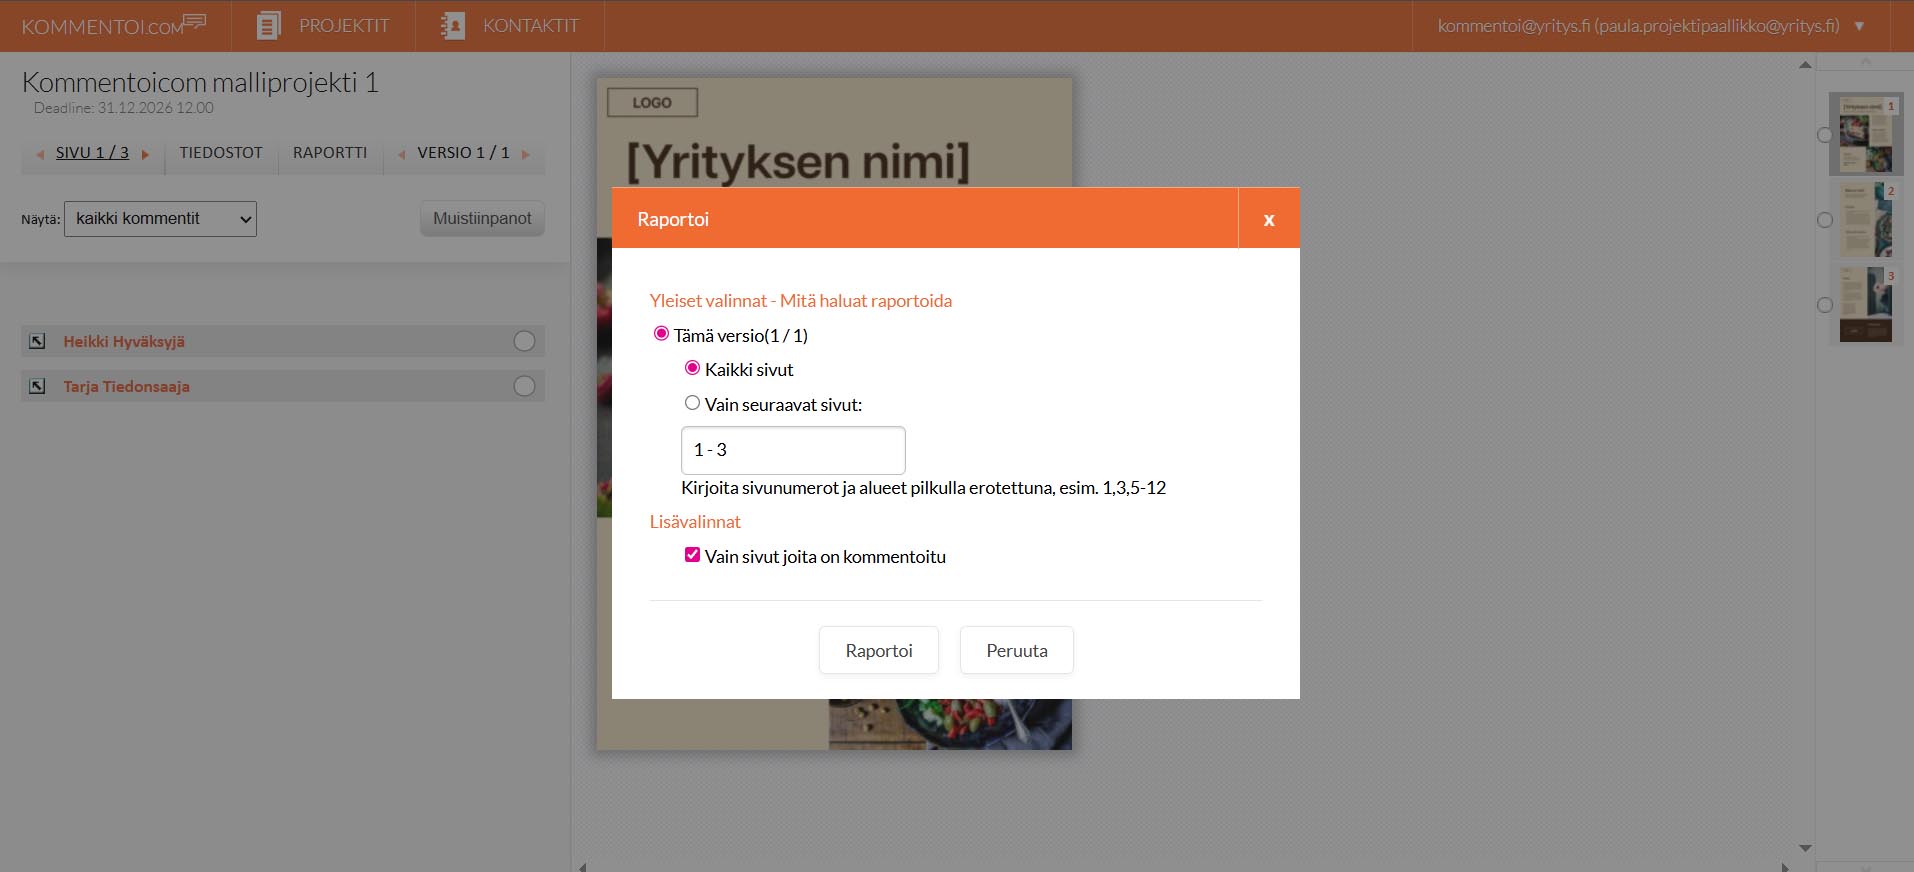
Report

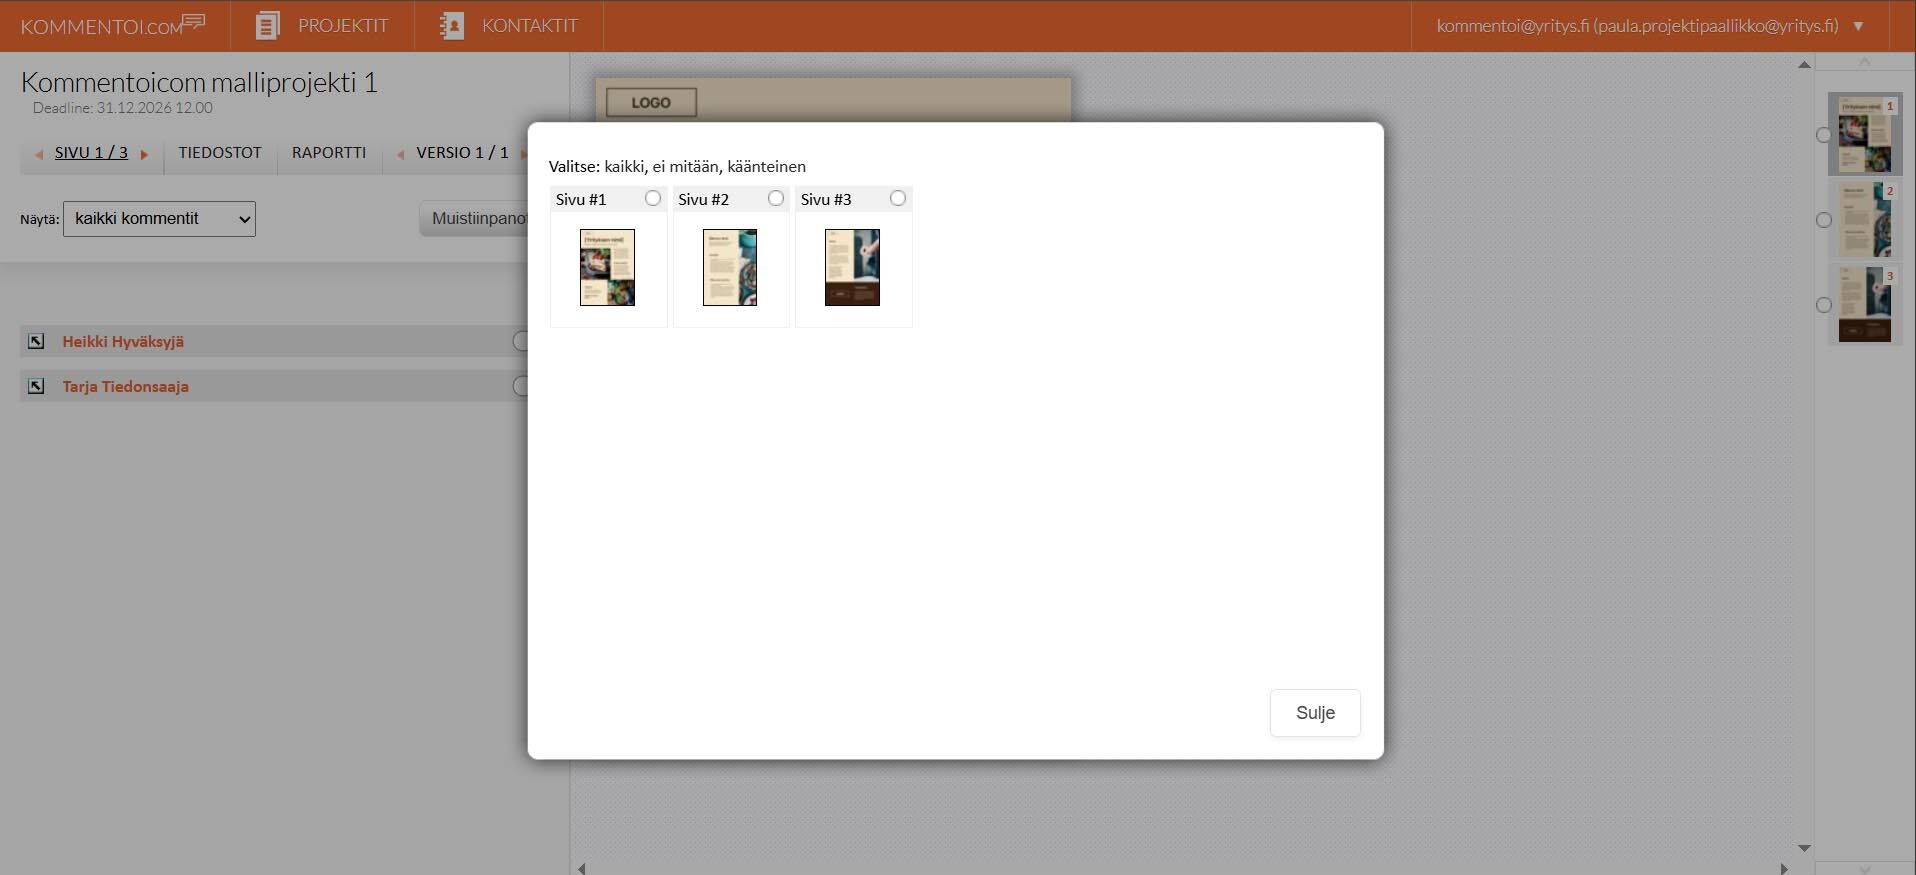
Using the Report function, you can generate a summary of all comments, approvals, and rejections recorded for the material.


You can choose to generate the report for selected pages or only for pages that have been reviewed (approved or rejected).

Pages


Project Notes

You can use the project notes section to record your own notes related to the project. These notes are visible only to you.

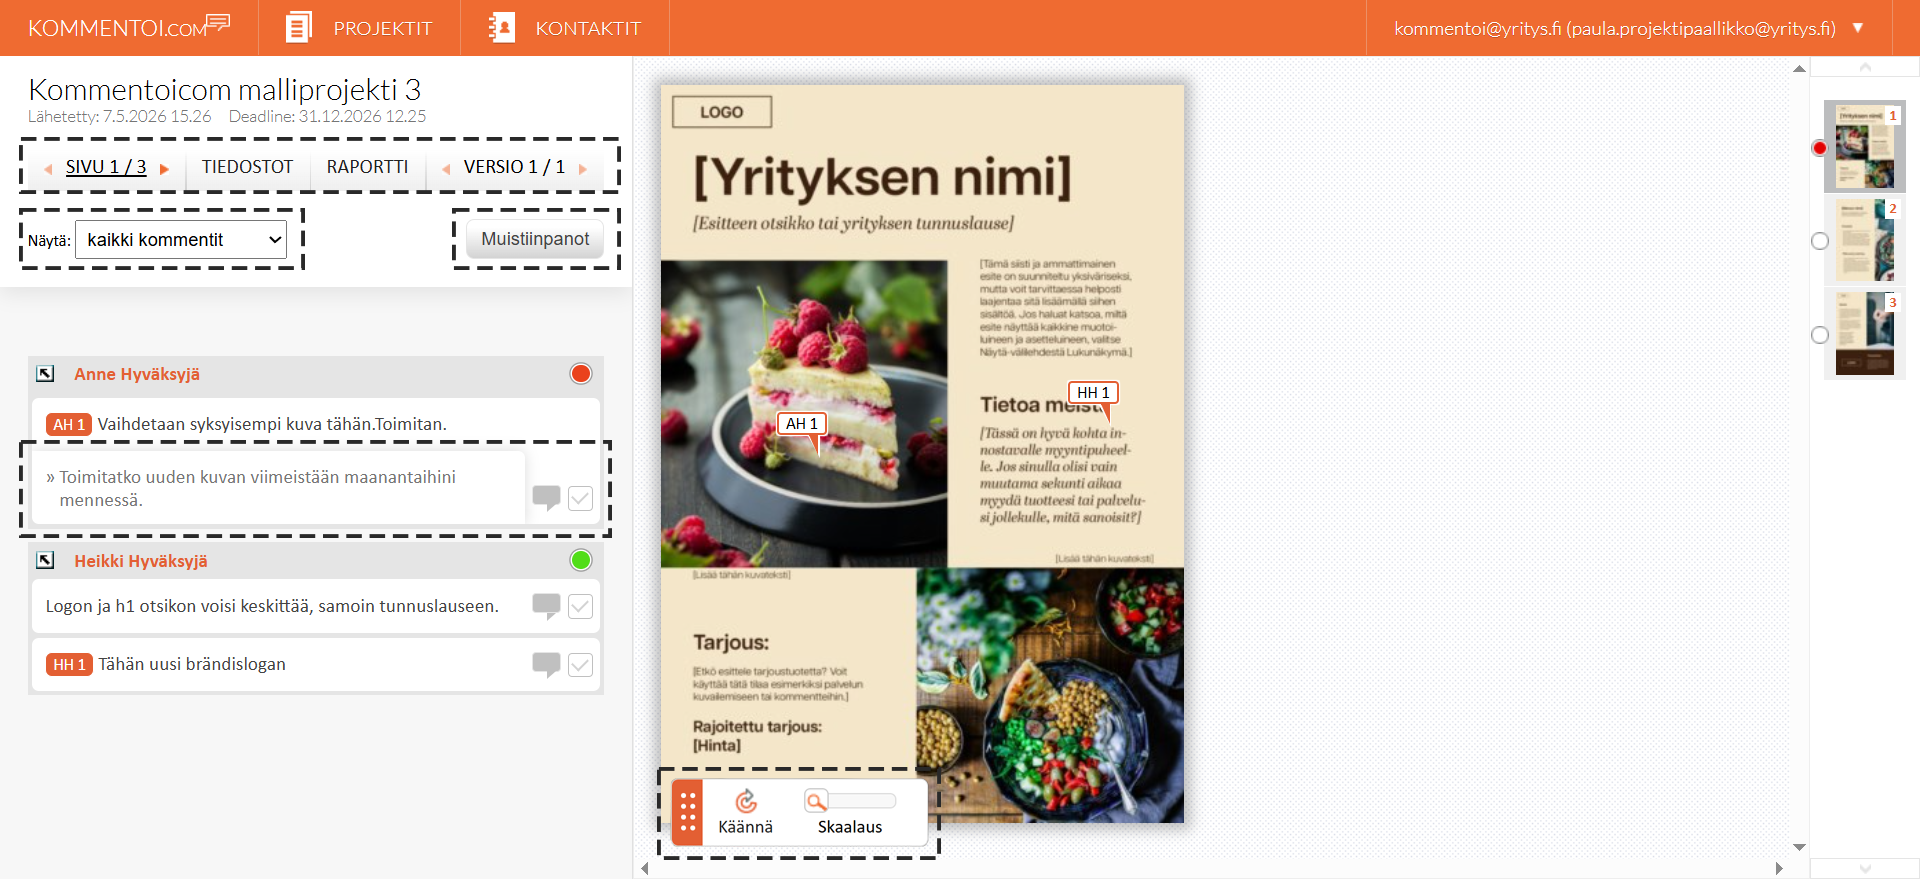
Tools in the Comment View


Page Selection

Browse through the project pages. You can also select the desired page directly from the page icons on the right side of the view.


Versions

View previous versions of the project and the comments made on them. This allows you to verify that all recorded comments have been taken into account in the new version.


Rotate

Rotate the page on screen. This is especially useful when reviewing packaging materials, where some parts of the material may be oriented incorrectly.

 
Zoom

Zoom in on the page to view smaller details or text more clearly.


Comment Filtering

You can choose whether the comment list shows comments from everyone, comments from a single person, or only your own comments.


Project Notes

You can use the project notes section to record your own notes related to the project. These notes are visible only to you.


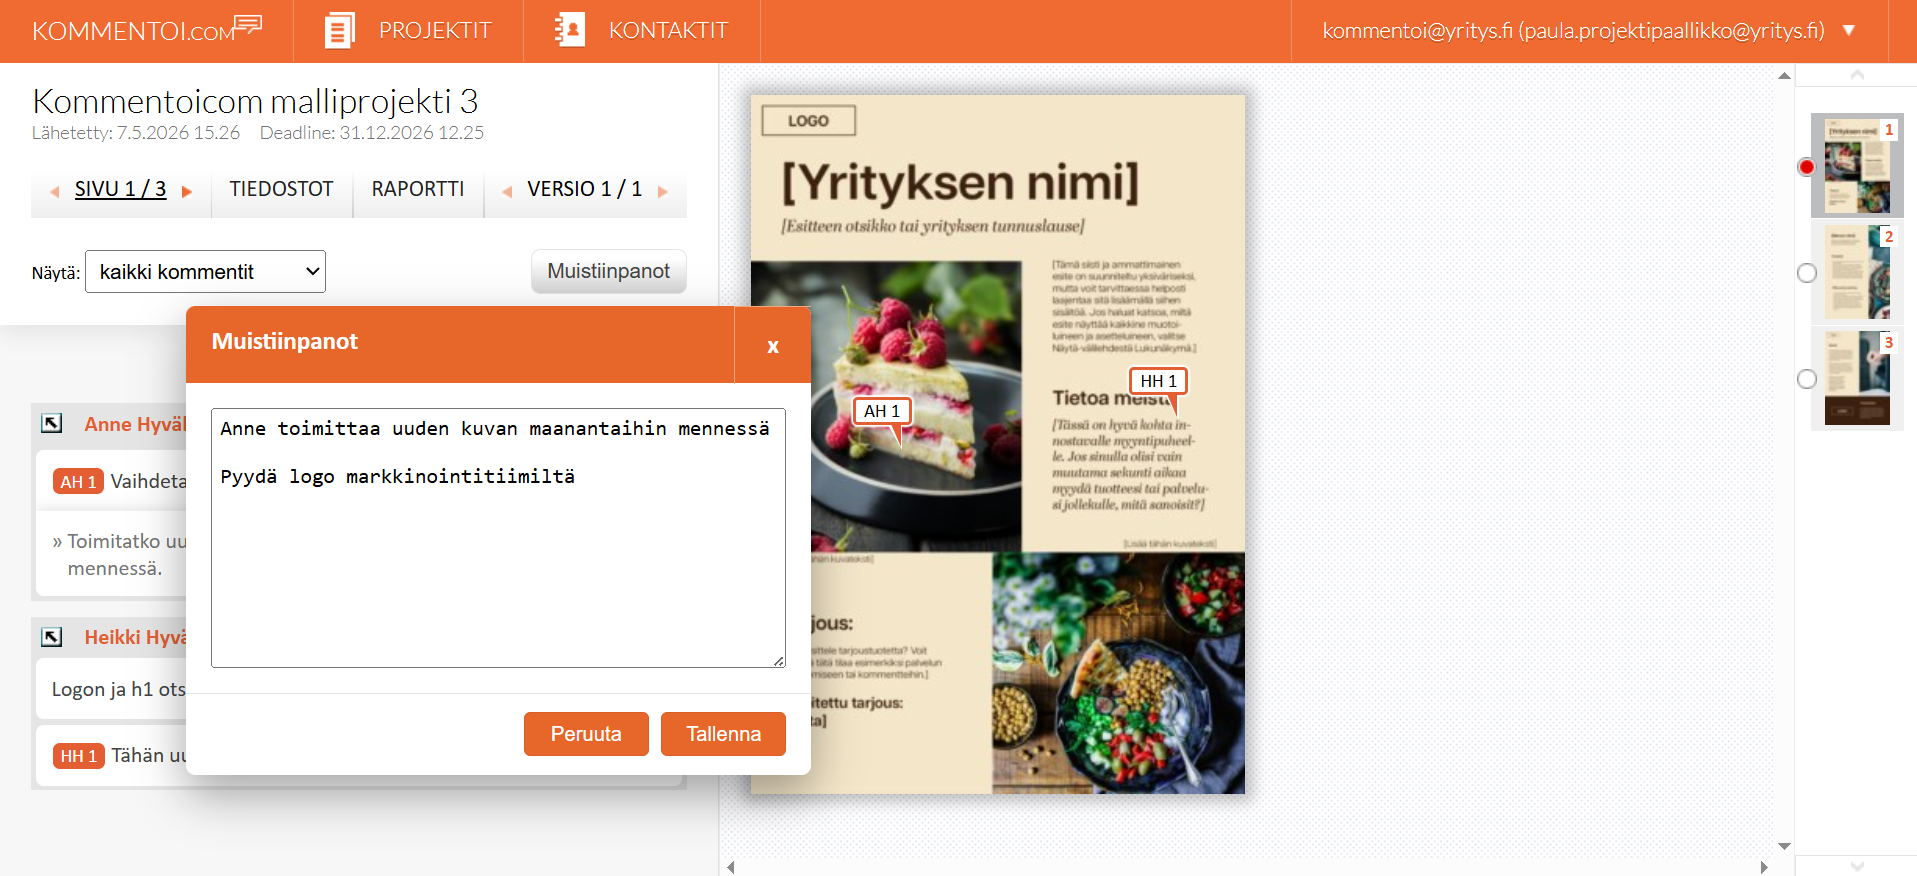
Comment Note

You can add a note to commenters’ comments that is visible only to you. This works as a comment-specific personal note.


Mark a Comment as Processed

This function helps you keep track of which comments you have already processed.

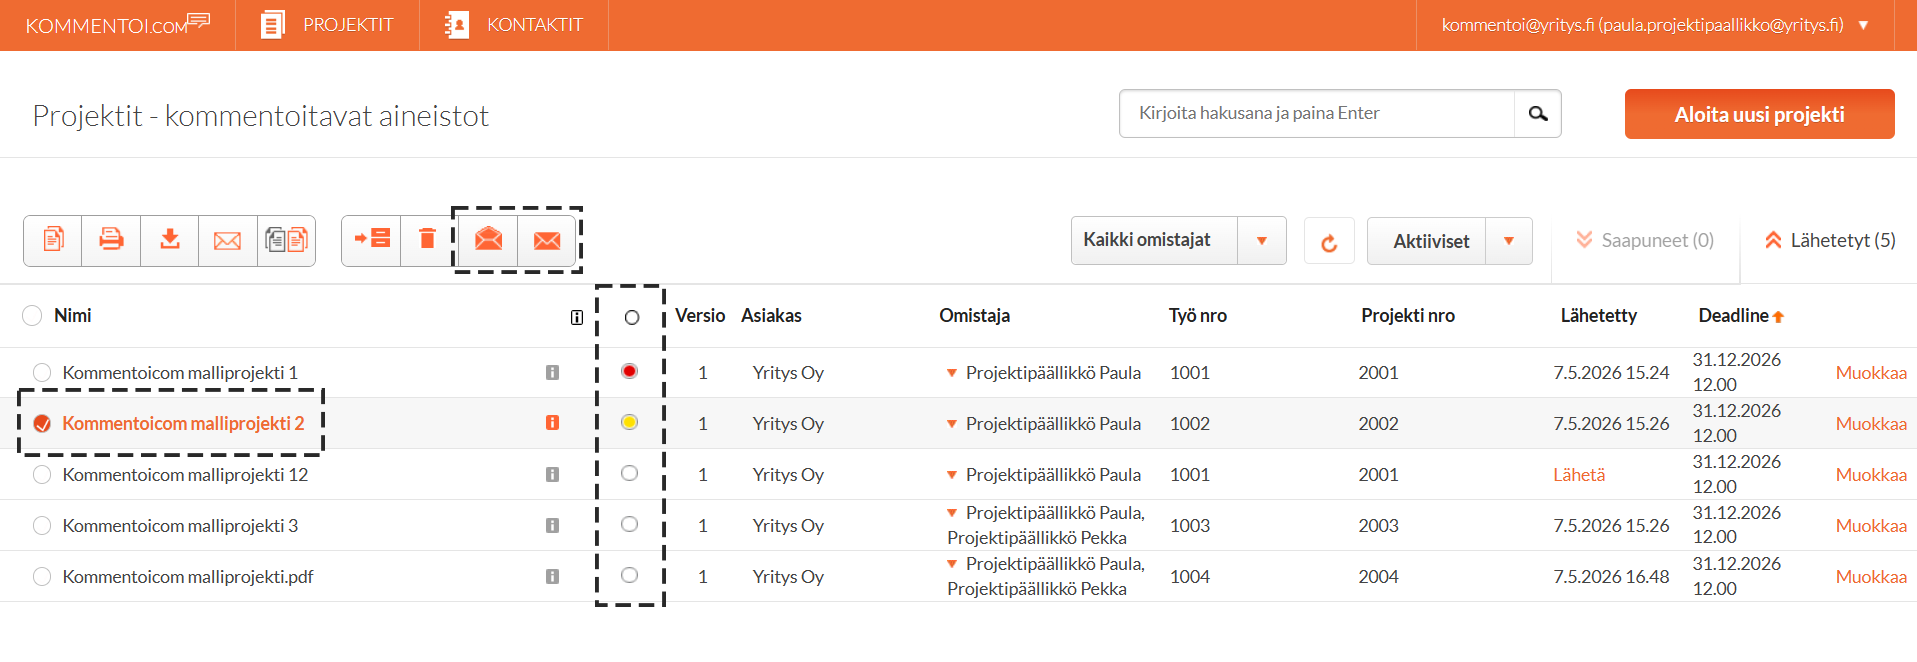
Functions in the Project List


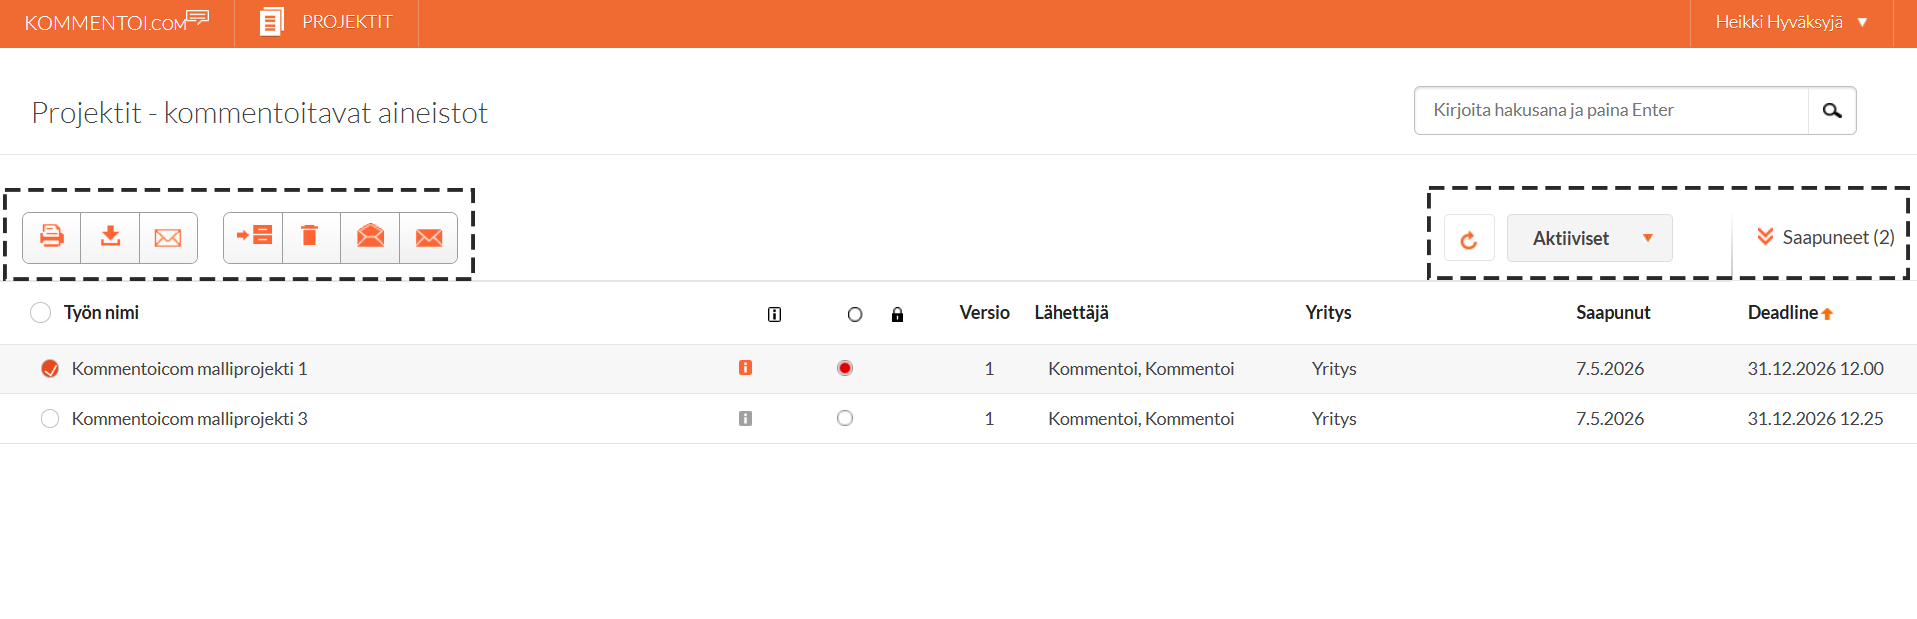
Files

Here you can download the original file being reviewed as well as any additional attachments uploaded to the project by the workgroup members.


You can also add attachments to the project yourself and define them either as private or available to the entire project group.

 
Message

Here you can send messages to the workgroup of the selected project or to individual members of the workgroup. Messages are delivered to the recipients by email.


Archive

Keep your project list organized by moving completed projects to the archive. You can restore a project from the archive back to active projects at any time, or create a new version of an archived project, in which case the project is automatically returned to active status.

Projects in the archive cannot be commented on by the project group.


Delete
Deletes the project permanently from your account. Deleted projects cannot be restored, and they can no longer be commented on by the project group.


Mark as Read / Mark as Unread

Highlight or remove the highlight from a project row to help keep track of which projects require your attention.


When new comments are added, the project row is highlighted automatically.


Active / Archived

View your active projects or the projects you have archived.


Sent

Shows the total number of projects in the currently selected list view. The orange number indicates how many projects are marked as unread.

 
Search

Searches for projects in the current list view based on the project name.

My Page Section

You can access the My Page section from the drop-down menu in the upper-right corner of the service. There you can, for example, change your account password and define what kinds of notifications you want to receive about projects and the progress of the review process.

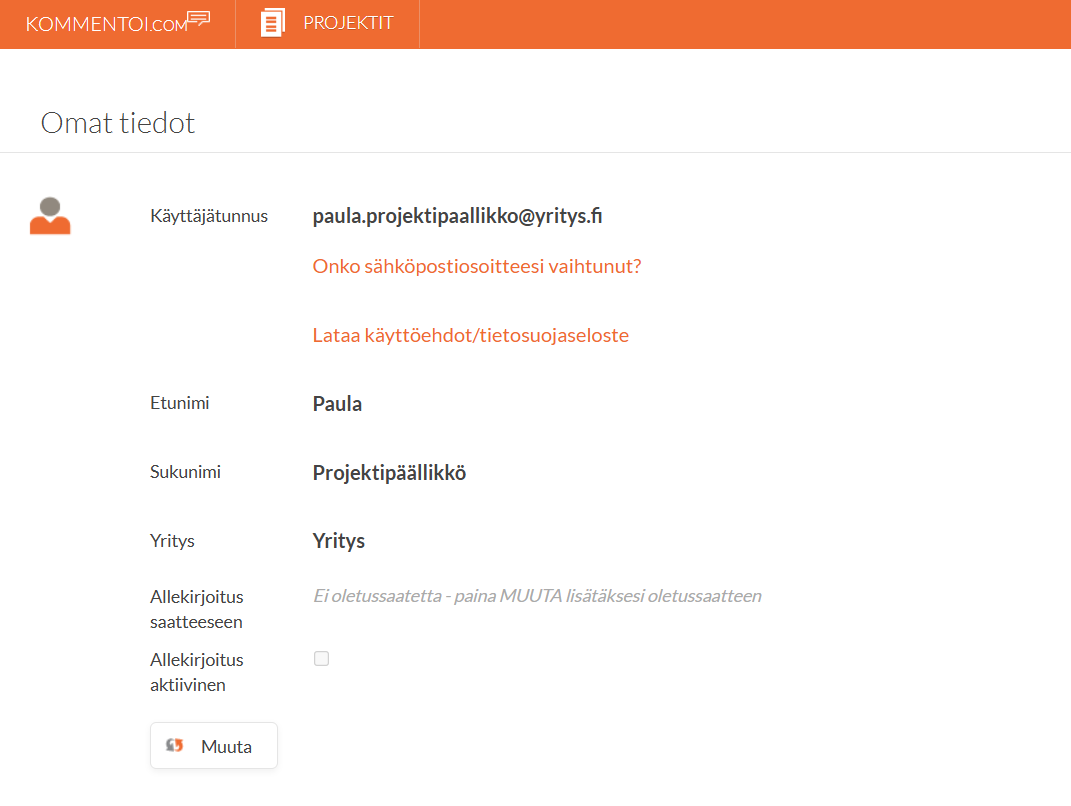
Personal Information

You can define your name and company information here. If your email address has changed, please contact our support team at support@kommentoi.com
You can also create a default signature, which will automatically be included in the cover message field of the projects you send.

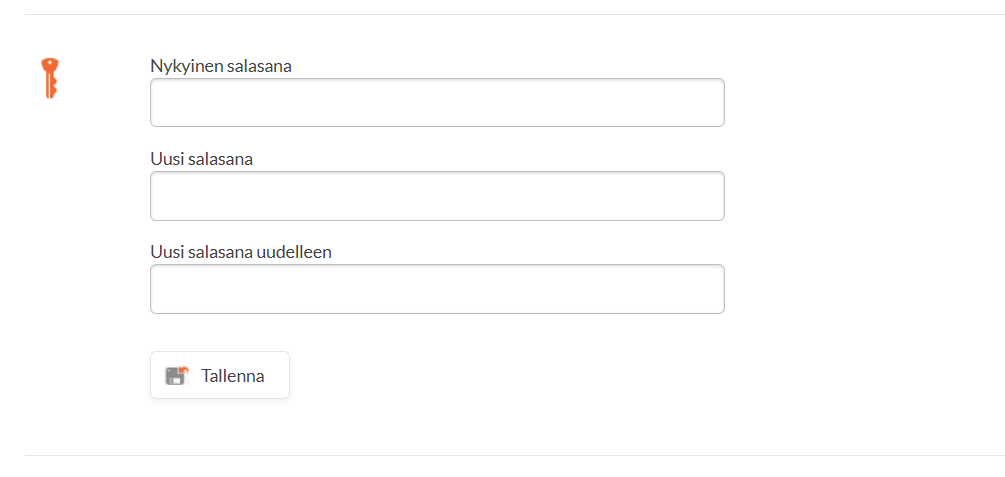
Change Password

You can change your password to one of your choice at any time and as often as you like.


Language Selection

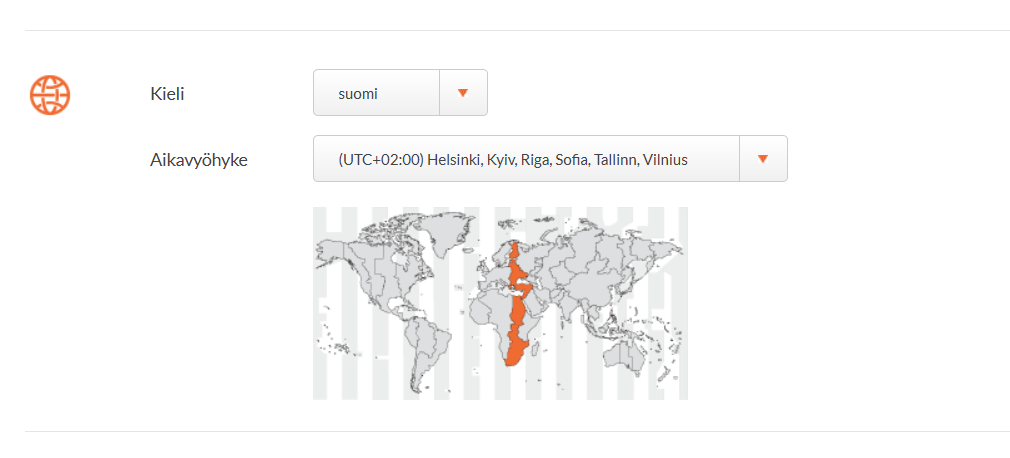
Select the language of the service. Available languages are Finnish, Swedish, and English.

Time Zone

Select the correct time zone to ensure that project deadlines and reminders are set correctly.


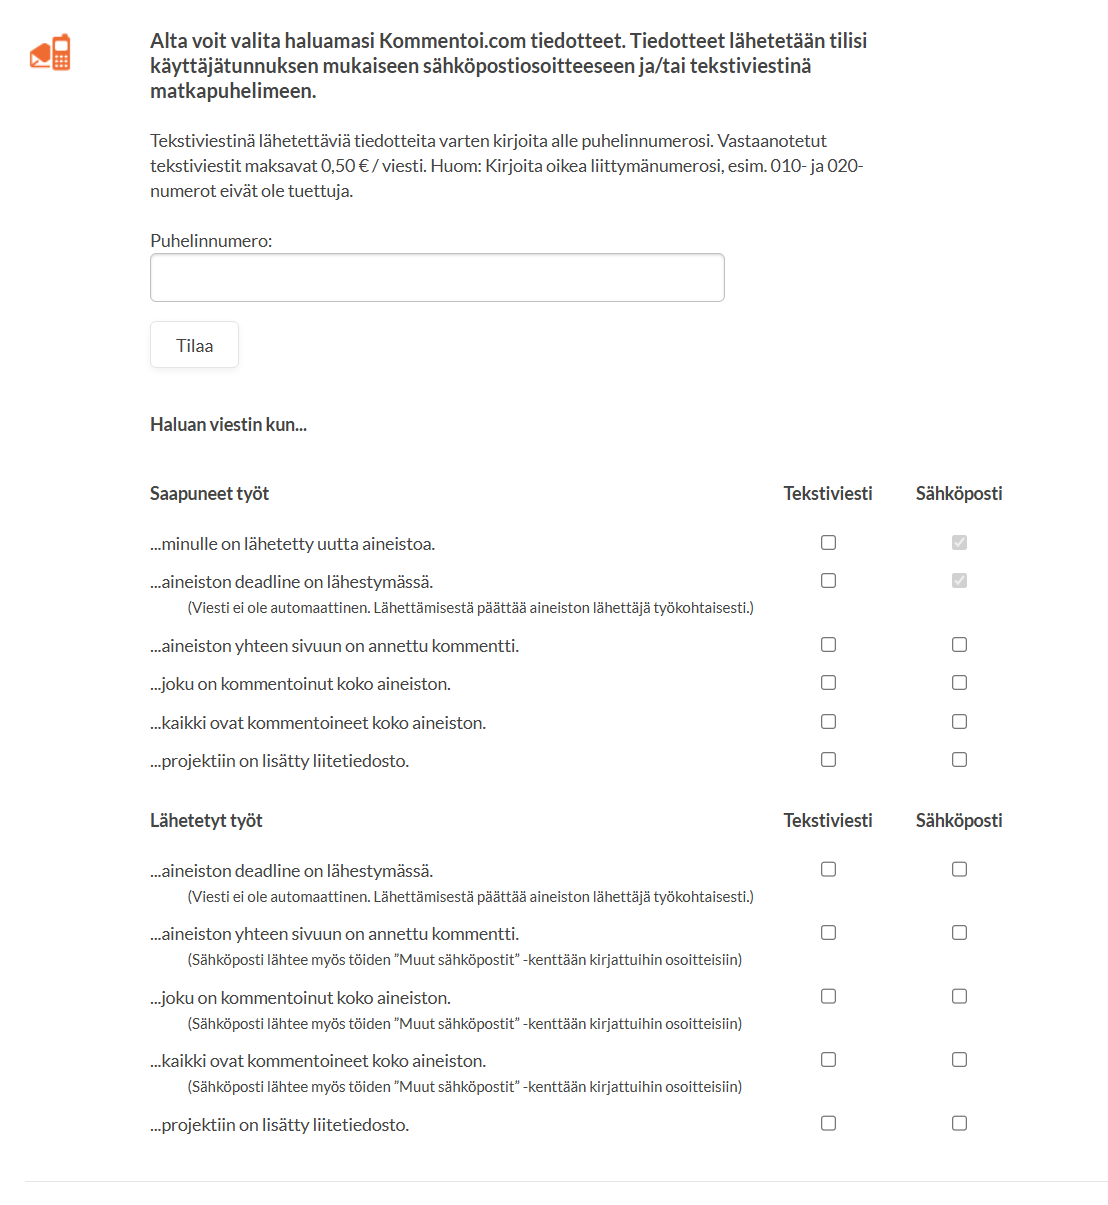
Project Notifications

You can choose which automatic notifications you want to receive about the progress of your projects.

Notification settings can be configured separately for projects sent to you and projects sent by you.

All notifications can also be received as text messages (SMS). SMS notifications work only with Finnish mobile subscriptions where premium text messages are not blocked.

If you use your organization’s shared group account, all Sent Projects settings configured in the My Page section of your personal account will also apply to all projects you create under the shared group account where you have selected yourself as the project owner.

Scroll to Top